A holistic approach to health, joy, and good food.

Wednesday, August 17, 2011

Super Easy Peanut Butter Cups...

This recipe has a slight metamorphosis story...way back when, I started making the filling with natural store bought peanut butter, and 1/4 cup powdered sugar...then we moved to 1/8 cup sugar, then to 2 Tablespoons sugar, then to one, and then to none.  And then we started using churned peanut butter from the health food store.  Then we ended up making our own organic, dry roasted, no salt added peanut butter (see below), and that was fun.  We also switched from regular chocolate chips to vegan chocolate chips, and now to grain sweetened chocolate chips...Maybe one day we'll start making our own chocolate :) Who knows where this could go from here?  (Raw Peanut Butter Cups anyone?)


These have 2 ingredients, and are too easy to make: 
1 cup peanut butter (of your choice)
1 bag of chocolate chips (typically 12 oz.)
cupcake liners


OK, so the above picture was me ripping into it, hence the devastated peanut butter cup!  But I've also noticed that the grain sweetened chocolate chips don't melt as well (and as a result, resolve in an less pretty PB cup). Although a little less healthy, you can achieve a pretty clean peanut butter cup by using the vegan chocolate chips. 

In a double boiler, melt the contents of the chocolate chip bag until smooth and creamy.  Place cupcake wrappers into a cupcake tin, and with a pastry brush, brush the chocolate to form a little crust at the bottom of the wrapper.  Do this to all of the cupcake liners.  Then take 1 teaspoon of peanut butter, and fill each of the cupcake wrappers.  Cover with the remaining chocolate and smooth it down so the top of the cupcakes look somewhat flat.   Freeze for about 1 hour and enjoy.  May be stored in refrigerator or freezer.  


Tamari Collard Tofu Wraps...

These are great for sandwiches on the go, when you have nothing else in the fridge, or simply when you're reaching for some healthy version of finger foods.  You can use any filling you'd like alongside the tofu - scallions, broccoli stems, cucumber, radishes, tomatoes, avocado....and if you feel adventurous, you can even try miso, seaweed, and a spreading of almond butter!  But maybe not all together.  Or, if you have a stomach of steel, try them all together!  

1 block of organic extra firm tofu
1/3 cup tamari
1 package shitake mushrooms, washed, de-stemmed, and cut in half
spiralized daikon radish, raw
spiralized carrots, raw
6 raw collard leaves


Preheat oven to 350 degrees.  Place the tofu block on its side, and slice the tofu block into two thin versions of the already existing block.  Keep them stacked together, and slice in half lengthwise, and in thirds width wise to create 12 thin equal pieces. Place these in a single layer in an oven proof casserole dish and drizzle with the tamari.   Add the shitakes, and bake for about 20 minutes or so, or until the sauce is completely evaporated.  Let cool enough to handle.

On a cutting board, cut the whole collard leaf into two sides, a left and a right, lengthwise on either side of the stem.  Remove the stem, and continue with all the other leaves in this manner.   You should have 6 halves of leaves at the end.  

When ready to roll, place a collard segment with the dark side (the front of the leaf) down, and the light side (back side) up towards you.  Fill the bottom of the leaf with 1 slice tofu, some shitake mushrooms, and some carrots and daikon. Roll this mixture in the collard leaf until it reaches the top of the leaf.  Cut this roll into two equal sized pieces, and enjoy!  Can be served sushi style with tamari and wasabi, or ponzu sauce if you wish.  It would also be great with a thai peanut dipping sauce too! 


Vegan Cream of Broccoli Soup...

This recipe is inspired by Terry Walter's "Clean Start" book, which is superbly glorious and deserves a lot of respect.  I've changed it here a bit, though, and so can you.  But definitely make a trip out to a bookstore to check out all of her books, since you'll be using them all the time (like I do :)  


This recipe is perfect for those convinced that you can't have a creamy texture without cream or butter.  In fact, the oatmeal here actually helps your heart, instead of breaking it, so eat this every day if you wish! Just start out slowly, since the broccoli sometimes promotes gas.   Listen to your body, if you have difficulty digesting cruciferous veggies, and maybe stop at one bowl....  


That said, the cruciferous broccoli is anti-cancer in so many ways, and the onion and garlic are great in boosting immunity, so this actually makes a great replacement for chicken noodle soup during the cold/flu season.  The almond milk (you can make your own) adds some added protein, too...you really can't go wrong.  


1 teaspoon olive oil plus 1 tablespoon water
1 onion, diced
2 garlic cloves, diced
dash celtic sea salt
7 cups broccoli tops and stems, bite sized pieces
3 cups unsweetened almond milk
2 cups water
1 cup rolled oats
1 tablespoon "Organic Better Than Bouillon Vegetable Base" 
(or your choice of bouillon)


In a deep bottomed soup pot, heat the oil, then water, then onion, garlic, and salt and cook until translucent and wilted, semi covered. Add the milk, water, and oats and cook semi covered on medium low (simmering) for about 20 minutes or until the oatmeal softens and thickens the soup.  Add the bouillon in the last 5 minutes of cooking.  Blend 3/4 of the mixture using an immersion blender, or in a blender of your choices, and then return to the pot with the remaining soup.  Enjoy!  

Creamy Garlic Kale with Quinoa Pilaf...

So this one also was gone before I could take any pictures (I served it in a vegan class last night), but I promise I'll make it again soon for the "sight factor".  The sauce for this kale is just delicious, and you can use it on raw kale or steamed kale equally well.  This kale recipe (minus the quinoa) is an adaptation of an adaptation of a recipe (yes you read that right) from The Nutritarian Handbook by Joel Furhman, M.D. Page 117, who is an incredible educator, doctor, and inspired cook.  All of his books are incredibly well written and life changing, so I urge you to go out today and read them. 


You need to soak a cup of cashews overnight in the fridge, so they're submerged in water.  When you're ready to use them the next day, drain and rinse well, and you're ready to go.  Also, when you're ready to make this recipe, make the quinoa first since it takes longer to cook, and then the kale. 


For the quinoa pilaf: 

1 yellow onion, diced
1/2 to 1 teaspoon extra virgin olive oil 
a dash of celtic sea salt
1/2 cup tan quinoa (rinsed really well, drained)
2 cups water

Heat a medium pot for a few minutes, then add the oil to heat.  Add the onions, dash of salt, and cover over low-medium heat.  In a few minutes, the onions will release some water.  If you decide not to cover, you can always add a bit of water so the onions half sautee in olive oil/water, and it's not exactly frying. Add the quinoa to the translucent onions, and add the water.  Let it return to a boil, then turn the heat down to a simmer. Cover with a bit of a slant so that steam escapes, and stir every 4 minutes or so, to prevent sticking.  It should be done in roughly 20 minutes or so.  


For the kale with cream sauce:  you'll need 2 bunches of kale (purple or green), de-stemmed and torn into bite sized pieces.


Cream Sauce ingredients:
1 cup soaked cashews (soak overnight in water, in fridge, 
drain in the morning and you're good to go)
1 cup unsweetened almond milk
2 cloves of garlic
1 tablespoon onion flakes


Lightly steam kale for about 5 minutes, just until bright green but having a bit of a bite.


In a Vitamix, or a powerful blender, combine the sauce ingredients and blend until smooth.  Add some of the sauce (this recipe makes a lot, so add as much as you like) to the greens, and just mix to coat and warm a bit.  Do not cook this any longer, since you want a bite to the kale.  Serve with the quinoa on the side, and gobble it up!  Yum!

Coconut Sweet Potato Mash and Maple Baked Tempeh...

I don't have a complete photo for this unfortunately since it's all gone...I did fine an old photo of the sweet potatoes, so I'm including it here, but the tempeh rests well in the tummies of many happy people... so I write this recipe brokenheartedly in its memory. At some point, I'm sure I'll make it again, but it was too delicious to save for a photo.  

Alas.  (insert sigh) Here we go.

Picture this...warm, sweet, and heartwarming sweet potatoes served with a side of caramelized, garlic and ginger spiced tempeh.  Perfect for autumn.  Actually, perfect for a rainy day smack in the middle of summer, which is how I served it last night.  

It's actually really simple to make things taste good when they are in its pure form - just grains, just veggies, just fruits, just simple ingredients that come from natural sources.  It's when we add the unidentified fillers and random non-digestible particles to help give an item shelf life that we run into trouble.

For this dish to work out, you have to time things well.  I bake the sweet potatoes earlier in the day so they're ready to go when I'm hungry, but I leave the in the oven so they stay warm.   30 minutes before dinner, I start on the marinade, then bake the tempeh, and make the fluffed potato mash as the tempeh cooks. Then in no time, it comes together. It's a good plan to follow.   I've made the recipe below to follow this order. 

Bake sweet potatoes:  
You'll need 4 medium sized sweet potatoes.  Scrub them under running water, puncture them with a fork many times, and wrap each one in aluminum foil.  I bake mine in a convection oven at 350 degrees, for about 1 hour.  I recheck them, and depending on the size, they might need an extra 30 minutes or so. You want them soft to the touch.  Also, you can bake them for 1 hour, and just leave them in the oven with the temperature off.  By dinnertime, they'll be done and ready to mash. 

Tempeh:  You'll need two rectangular packages of tempeh, any flavor, preferably organic, cut into 1 inch strips (on the short side, so there are many short strips instead of a few longs trips).  Tempeh tends to be a bit bitter, so I typically steam if for a few minutes as I'm getting the marinade ready. It softens the tempeh a bit and helps it absorb the marinade well, and gets rid of that bitter taste.  

Mix the following ingredients well in a glass ovenproof casserole dish:  

4 T maple syrup
3 T tamari
2 T toasted sesame oil
1 T raw apple cider vinegar, rice vinegar, or balsamic vinegar
1 T mirin (optional)
1 inch ginger, grated fine
2 garlic cloves, grated fine
Freshly ground Black Pepper, and a dash of cayenne

Place the tempeh in the same dish and coat with the marinade.  Bake at 350 degrees in the center of your oven for roughly 15 minutes or so, until most of the marinade is absorbed in the tempeh, and it begins to brown a bit. 


As the tempeh cooks, make the sweet potato mash:  

Your already-baked sweet potatoes
3 T coconut water
dash of cinnamon, curry powder, and/or clove powder, to taste
1 T maple syrup or raw local honey (optional)
dash of celtic sea salt
black pepper, to taste


If you don't mind the look of it, just mash the sweet potatoes together with the peels and all.  It will taste more hearty and will be more packed with fiber and nutrients from the peel.  If you don't care for the peel, scoop out the sweet potatoes and just mash the insides into a whipped consistency.  Add the remaining ingredients to the potatoes.  On the side, heat in a dry cast iron skillet 2 T unsweetened dried coconut flakes and 2 T slivered almonds until fragrant and semi-toasted (you have to watch it really well since they can burn quite easily). Shake the pan often and watch it like a hawk.  When done, scatter this beautiful mixture over your sweet potatoes.  

Take the tempeh out and serve on the side.  This is so complete, you'll devour it.  Enjoy!


Friday, August 12, 2011

Raw Ice cream...

Many people who are interested in making healthy choices in their diets have some difficulty leaving their beloved favorites...like burgers, cheese, creamy sauces, and many desserts. By the way, you can make any of those things in a healthy way, and especially in a raw way so you reap vital nutrients from your food.  Yes, even burgers!  But moving on....


Can you imagine a creamy dessert that's raw, flavorful, and simply divine?  This is it.  I promise you, it will knock your socks off (and your kids' socks off too).  You can add many things to it, fillings such as nuts, even cacao nibs, or hazelnut extract.  Or have it simply be - just one ingredient.


Peel 4 very ripe bananas (with brown spots), peeled.
Freeze them.  
That's it.


You can certainly slice the bananas and then freeze them if you want, but I like cutting through them when they're frozen - it's sort of a challenge I look forward to that makes this dessert worth waiting for.  It can't be too easy now....


Place said frozen bananas on a cutting board.  Slice them up.  Put them in a food processor.  Make it do its thing.  Scrape down sides.  Make it do its thing again.  Scrape down sides.  Continue in this fashion until it starts to get really creamy.  Then pick up a spoon and eat.


You can add raw almond butter (or if not raw, even organic peanut butter) and make a "chunky monkey" treat.  Or even add 1-2 tablespoons of raw cacao to make it a chocolatey thing.  Your call. Just sit back and enjoy.  

Tuesday, August 9, 2011

Fresh Spring Rolls with Peanut Sauce...

My diet most of the time comprises of raw fruits, veggies, nuts, seeds, nut milks, and yummy fruit based desserts.....although sometimes I do crave something soft and bread-like to sink my teeth into. These fresh spring rolls are naughty enough for me to get that texture, but in reality they're just a raw food delivery system.  You can certainly use these without the sauce but if you don't mind eating non-raw food items once in a while, this dip is super high in protein and will keep you feeling full and satisfied with just a little.  

The staples are the skins and sauce, and then whatever you choose to put in there is up to you.  Here are some ideas, all julienned or cut into some sort of strip:

scallions, cucumbers, carrots, squash, tomatoes, avocado, lettuce, cabbage, red radishes, daikon, lettuce, kimchee, hemp seeds, sesame seeds, sunflower seeds, pea shoots, sprouted grains and beans, any kind of green sprout, and on and on...
If you wanted to get your kids to eat their salad, you can even stuff it into these convenient pouches and zip them out the door on the way to a game.  They're light and yummy.

The three secret ingredients to any spring roll are the herbs:  cilantro, basil and mint.  If you want it to taste authentic, I recommend you use them.  If you just want something quick and simple (like me after a hard day), then feel free to do with or without.
The secret to building these is preparation...make your sauce first (it keeps well), and then cut all of your veggies and have them ready.  Then soak the rice skins, fill, fold, and chomp.  Timing the soaking of the skins is also important.  When you dip the skins in water, you want them to soften up a little bit, but not too much.  Too limp makes them fall apart, and too rigid makes them unbendable, so do a few first until you get the hang of it.  I've also found that some brands, I can pick them up when they're still somewhat rigid, fill them, and they loosen up on the mat (I tried this with other brands, thinking it would do the same, and unfortunately, I ended up with a rigid skin that wouldn't fold).  Again - before you go out and make these for your guests, experiment first :)
Peanut sauce (in clockwise order, starting at the 9:00 position):
2 tablespoons tamari
1 tablespoon apple cider vinegar
2 chopped garlic cloves
2 tablespoons raw honey
1 tablespoon jalapeno pepper
1 teaspoon grated ginger
1 tablespoon toasted sesame oil
(not shown) 3/4 cups of home made (or organic, store bought) peanut butter


Blend all ingredients in a food processor.  Begin to drizzle roughly 1/4 cup plus 2 tablespoons of water until the mixture becomes lighter in color and fluffier.  You can make this as thick or thin as you want, adding water to your liking.  


To make the spring rolls:  
Dip one rice paper in water until it turns soft, and place on your sushi mat (or a cutting board).  
Fill the bottom third of the rice paper with veggies, 
leaving a little bit of empty rice paper at the very bottom 
(you'll use this to fold over and attach to the top portion of the rice paper).  
Fold the bottom of the paper over the veggies making sure the veggies are tight inside 
(the skin is relatively stretchy).
Fold both sides over the veggies, making sure the veggies are tight.
Continue to roll up until the whole roll, making sure the veggies are tight.
Serve with peanut sauce, and enjoy! 


Almond Milk...

I love this every which way...simply, with just almonds for a purist's delight, or with some cacao added in for chocolate milk, with or without a sweetener (dates usually), or maybe when you're feeling wild you can add cinnamon, cardamom, and clove for a chai effect.  Either way, it's SO much better for you than cow's milk, without all the bovine growth hormones and antibiotics that your body will go for weeks trying to sort out of your system.  I say keep it simple, plant-based, and you'll reap the benefits.  


You want to soak your raw almonds overnight in the fridge (or outside is fine if it's not too humid/hot), submerged in plenty of water.  When you take them out in the morning, you can either rub the skins off or leave them in for added nutrients/flavor/fiber.  I just leave them on and don't fuss with it.  These soaked almonds have a great taste, and in my opinion, are much more digestible than their raw un-soaked counterparts. They're crunchy but filled with water and because of that, they hydrate you more than un-soaked nuts.


You can use any kind of nut, typically, but I like the hard nuts better - cashews, almonds, hazelnuts, etc.  


Just so you know, if you don't strain the milk of its pulp, you reap more nutrition. The recipes below call to strain the pulp out (which you can always dehydrate into cookies, or save, dry out, and grind into a flour), but I typically don't for my taste.  I like the added protein. You can experiment and see which you like better.  


1 cup dried almonds, hazelnuts, or cashews
Enough water to soak

and 5 cups purified water to make the milk


Basic recipe:  Soak your nuts overnight, drain and rinse, and place them in the vitamix with the 5 cups of water.  Pulse for a few minutes until blended, strain through a nut milk bag or a spouter bag, and enjoy. This should keep up to 5 days in the fridge.  


Sweetened almond vanilla milk:  Soak your nuts overnight, drain and rinse, and place them in the vitamix with the 5 cups of water.  Add 6-8 pitted dates, and 2 tablespoons vanilla extract.  Pulse for a few minutes until blended, strain through a nut milk bag or a sprouter bag, and enjoy. This should keep up to 5 days in the fridge. 


Chocolate milk:  Soak your nuts overnight, drain and rinse, and place them in the vitamix with the 5 cups of water.  Add 6-8 pitted dates, 1/3 cup cacao, and 2 tablespoons vanilla extract.  Pulse for a few minutes until blended, strain through a nut milk bag or a spouter bag, and enjoy. This should keep up to 5 days in the fridge.   


Also, you can have heated milk and still call it raw...heat up the milk on the stove just about a minute or so, and test it by being able to poke your finger in it.  If it feels warm, then it's perfect, and you've saved yourself the enzymes.  Drink up!

Monday, August 8, 2011

Mango Honey Lime Sherbert...

I tried this at my last raw class and the hardest part of me is remembering the quantities of the ingredients...very often I throw stuff into the vitamix and taste as I go, remembering little of how much I put in.  Most of the time, I surprise myself with the same recipe never tasting the same...I sort of like that, though.  

August is a time for mangos, and when I make this I much prefer cubing my own fresh mango and freezing it. You can certainly use frozen mango chunks if you want, however when they're $1 each, you can't go wrong.  Buy fresh.  


Also, I love raw local honey.  Eat one tablespoon a day starting in the summer, through winter, and then come Springtime you'll thank yourself.  You've built a serious defense system against any little bugger that might make your nose run and your eyes tear.  Forget the over the counter stuff...

You really do need a vitamix blender for this, otherwise you might do a serious number on your blender or food processor.  But in a pinch, it's worth a try, if you feel like your motor and blades can handle it. 

1 mango cubed, frozen
1/2 cup coconut water (preferably fresh) or water
1/8 - 1/4 cup raw local honey, depending on your taste 
(if you use water, use 1/4 sweetener...
if you use coconut water which is sweet, slow down on the sweetener)
shaved or grated lime peel


Place the water, agave and mango in a vitamix and pound away as it becomes a smooth soft serve consistency.  Pour out in bowls and serve with the shaved lime.  Delish!

Seaweed Salad Rice Wraps with KimChi...

Say that title 5 times in a row...I dare you.  I can't...but can say that I simply devoured these.  Honestly, I don't know what it is with me but I get these cravings like a pregnant lady once in a while, and they come over me like a fury...and it's always salt.  Nothing really satisfies it except for seaweed...I've tried olives, a salty dish, or anything savory I can think of....in the end, my body needs iodine or the thyroid-supporting agents in glorious seaweed. And after a few tastes of this salad, I'm just in heaven.


You can eat the salad as is, but I love them in these handy dandy little pockets of love that I can dip in the kimchi sauce, or even a home-made peanut sauce.   I'm very very conservative about the sauce ingredients amounts (yes, 3/4 tablespoon!) because I want the tastes without a runny dressing....nothing in my book is more off putting than runny sauces oozing everywhere they're not supposed to....our of sandwiches or rolls.  If they're thick, like a peanut sauce, that's a different story...but if it's runny, it's just plain yucky...So here goes.


Seaweed Salad and dressing:
1 cup dried wakame seaweed
spring water
1 teaspoon toasted sesame oil
1 teaspoon apple cider vinegar
3/4 tablespoon tamari
1/2 inch piece of ginger, grated
2 tablespoons sesame seeds
1 baby carrot, grated
1 tablespoons scallions, sliced(optional)
1/2 garlic clove, grated (optional)

For the rolls:
Any rice paper roll you can find (large or small)
2 tablespoons raw kimchi (or kimchee, since some spell it differently)


Before you start, soak the wakame in spring water (enough to cover and then some...) in a large bowl for 10 minutes.  It will reconstitute nicely and get plump and shiny.  Drain it and squeeze as much water as you can from the wakame, and place it back in the bowl.  Add all the dressing ingredients to the salad and mix.  Set aside.


Fill another bowl with spring water and submerge 1 rice paper sheet in the water...you can use your hands to move it around, or just leave it alone.  After about a minute or two, it should soften up.  You can either place this sheet flat on a sushi mat, or just on a cutting board.  On the bottom third of the sheet that's closest to your belly, add 1-2 tablespoons of the seaweed salad.  Use your fingers or the sushi mat to bring the paper edge and filling over itself to create and enclosure.  Bend the sides towards the middle, and then roll the rest of the sheet into a cylinder, making sure everything is tight and the contents are tucked in.  I promise, photos are coming soon...I know this procedure is a bit tricky to explain!  


Place the roll on a plate, with the seam on the underside.  Enjoy with kimchi.  This is GLORIOUS.  

A Small Carrot Harvest...

This is the first year of our garden and I am proud to have pulled out one gorgeous red carrot...the rest are a bit infantile and I put most of them back in the ground to grow some more, but this one I thought was lunch worthy. We all had a piece and it was sweet, delicious, and very earthy....I loved the inside look of it, which was a surprise to me.  Sweet, organic, and from the ground.  Does it get better than this?  I love dipping them in flax oil sprinkled with a little sea salt. 


Sharing Is Caring....

We have a doe who recently decided to traverse our neighborhood for the good part of the summer...in the picture below, she is eating the remaining harvest of peaches (whatever the squirrels left) and peach tree leaves.  She is gorgeous, although alone, and I worry about her...some drivers in this town who pass through aren't as patient on the roads as the locals, and she might have to fend for herself if she's crossing the street.  In the meantime, we surrounded our pepper and tomato plants with whatever chicken wire we have left, and hope  for the best. Luckily, we're not the only ones she visits :) Oh, doe...a deer...a female deer.


Steamed Greens with Sesame Mustard Sauce...

In the cold winter months, I tend to gravitate towards foods that taste naughty - sometimes salty, buttery, sweet...but in fact, I don't want the added consequence of eating that food, so I've come up with this to fool my taste buds.  Be forewarned, this might seem like a light meal but it is very filling.  Quite easily, I can eat this all myself (if I'm eating nothing else for the meal) and it carries me through.  I get the tastes I desire, but without the lethargy I usually feel after heavy meals.  


In this meal, you'll find sweet, salty, pungent, and spicy...all except for bitter.  I think that may be why it always feels comforting to eat it, and I feel satisfied.


Greens: 
1 head asparagus, trimmed (snap off the ends)
2-3 baby bok choy, cut into thirds
carrots, daikon, peas, or whatever other veggie you like (optional)

Dressing:
1 tablespoon toasted sesame oil (although untoasted is healthier, toasted has a better flavor)
2 tablespoons tamari
1 teaspoon apple cider vinegar (raw)
1 teaspoon raw honey or brown rice syrup
1/2 garlic clove, grated
1/2 inch ginger root, grated
salt and pepper to taste
1 to 2 tablespoons sesame seeds, depending on your taste
1 teaspoon mustard (I like whiskey mustard, but dijon works too)
1/4 jalapeno, seeded, and chopped (optional)


Place all the veggies in a steam basket (or steamer) over boiling water and steam until bright green - this is critical, since the first time I did this, I waited a while when I saw that the veggies were still a little hard, and pretty soon they turned to mush.  Better yet, take them out before you think they're done, since they'll continue to cook on your plate.  This might mean 2 minutes of steaming. 


While they're steaming, mix all the dressing ingredients together and let sit. When the veggies are done, promptly remove them to a bowl or plate and drizzle the dressing over.  If you feel adventurous, you can even sprinkle cilantro or thai basil on top.  Enjoy! LOVE it!


Lip Lickin' Hummus...


My mother loves hummus and radishes, so this picture is in tribute to the way she raised me :) I love their deep reds and spicy tones, and I (as my mom) think they are perfect with hummus.  I typically buy organic whole chickpeas and boil them myself, but in a pinch, I do unabashedly open up a can of organic chickpeas and use these instead.  This recipe uses the latter method.  I try to use Eden brands when possible (their cans are safer for the food).  I love my Vitamix, but I think you can use any type of blender (the result will just be a bit more chunky, and that's OK too).  


Two 15 oz can of organic chickpeas, liquid reserved
1 heaping tablespoon tahini
1 jalapeno pepper (without seeds, or if you dare, with seeds)
salt and pepper to taste

optional:  
1 clove of garlic
rosemary
extra virgin olive oil
grated lemon peel (organic lemons)
cumin and other indian spices
raw onion


Drain chickpeas but reserve the liquid.  In a blender, add the chickpeas and 1/2 cup of their juice.  If it doesn't budge, then add a little bit of the liquid at a time, and help it out by moving it around with a spatula until it "catches".  (When I made it, I actually emptied out the whole can in the blender, with all of its juices, and the result was a smooth hummus, but a bit on the thin side...I kind of like it that way, but if you want it thicker, you might want to start with 1/2 of the liquid).  Blend with the jalapeno, tahini, and salt and pepper to your liking.  Blend until smooth, and serve.If you are watching your salt, omit the liquid, drain the beans, and add about 3/4 cup or so of water to replace the liquid. For the most part, I eyeball it (exact measures is not a part of my chemical makeup).    For different flavors, add any of the optional additions above, for a kick and a bit of spunk in your step :) If you're planning to eat it or serve it within an hour of making it, add 1/2 of a red onion (minced) and you will love it.  I really to serve it plain with green peppers, red radishes, endive (best source of calcium!), red peppers, and scallions.  Yum! 


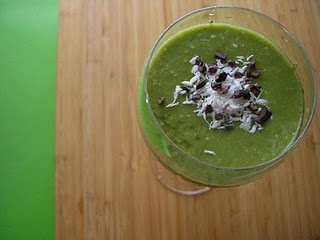
My Morning Green Wake Up Call Shake...


Welcome to my morning green shake, which consists of wonderful life and colorful foods.  Sometimes the recipe varies (will include more recipes of this shake later on) but this is one of my favorite.  This shake is UBER creamy and smooth and it satisfies my need for fats/oils (from the avocado).  It's fresh from the cucumber and sometimes spicy from the sprouts, and if you can believe it, by way of the cacao nibs, I actually get to eat chocolate in the morning!  And not have to hide it ;) Most if not all of the following is organic, and good for the soul.  I drink one large glass of this when I get hungry in the morning (not always when I get up, but most often 1 hour after I get up) and I chew every bite (you digest in the mouth, right?). The remaining shake I put in glass jars and save for the rest of the day, but try to finish it in 24 hours or else it oxidizes too fast.  Blend the following ingredients in the following order (I use a vitamix), and enjoy!


2 cups of fresh water
1-2 collard leaves
2 kale leaves (blend these first three ingredients together first before adding the rest). 

add 1 peeled cucumber  and the meat from 1 avocado (then blend)

add a handful of green sprouts (alfalfa, etc.), 
1 banana, 
and 1 tablespoon unsweetened coconut (then blend).


Blend until smooth.  Decorate with unsweetened coconut and raw cacao nibs, crumbled.